If you have some music files you want to enjoy on your media devices converting them to MP3 is an assured and brainless solution because MP3 is the most wanted audio format regarding universal usability. Meanwhile, you may be asking why there are so many audio formats out there and how you are supposed to know which format to go for? Choosing an audio format can be confusing without certain knowledge. Here we’ll list some advice for people in need and also, provide a tool to convert MP3 on Mac.

Tips to Choose Audio Formats
There are so many usages of existed audio formats that we don’t even remember all their extensions. But fortunately, for most of us, the decision is not hard to make with a few explanations down here.
Uncompressed Audio Formats
If what you want is the original and uncompressed audio directly captured from real soundwaves, uncompressed audio formats is the right pick. These formats keep the raw data of your audio without any compression and make the perfect material for raw editing.
Here are a few uncompressed audio formats you can choose from: WAV, AIFF, PCM, AU, etc.
Note: uncompressed audio files are much bigger in size so when you are finished with all the editing work, you can convert them to lossy formats for easier storage and transfer.
Lossless Compressed Audio Formats
If you are an audiophile pursuing the “high-end” listening experience, go for lossless compressed audio formats. These formats have smaller size than uncompressed audio formats but manage to perfectly keep all the data during compression. Audio files in lossless compressed audio formats are still very big, but at least they are the best choice for music lovers who are looking for extreme enjoyment for their ears.
Here are a few uncompressed audio formats you can choose from: FLAC, ALAC, WV, WMA Lossless, etc.
Note: lossless compressed audio won’t do you any good if you don’t invest in some audio equipment that can faithfully represent the sound. So, buy some good speakers and good headphones.
Lossy Compressed Audio Formats
If you are like most of us, wanting some hearing pleasure but without yearning for utmost quality, go for lossy compressed audio formats like most of us do because they provide the perfect balance between quality and size. Human ears have limitations, so theoretically most of us can’t tell the difference between lossy and lossless audio without certain equipment and years’ of practice.
Here are a few uncompressed audio formats you can choose from: MP3, WMA, AAC, Ogg Vorbis, MPC (Musepack), etc.
Note: MP3 is the most recommended format in terms of lossy audio because you can use it anywhere.
Best Software to Convert MP3 on Mac
Now we have listed the suggestions for choosing the appropriate audio formats according to your needs, but which is the best Mac audio converter to convert MP3 and other audio formats? All2MP3 for Mac is no doubt the best free solution. As the most powerful audio/video to MP3 converter software on Mac, it can convert any video formats to MP3 (check video to MP3 tutorial) and convert MP3 on Mac to change the quality.
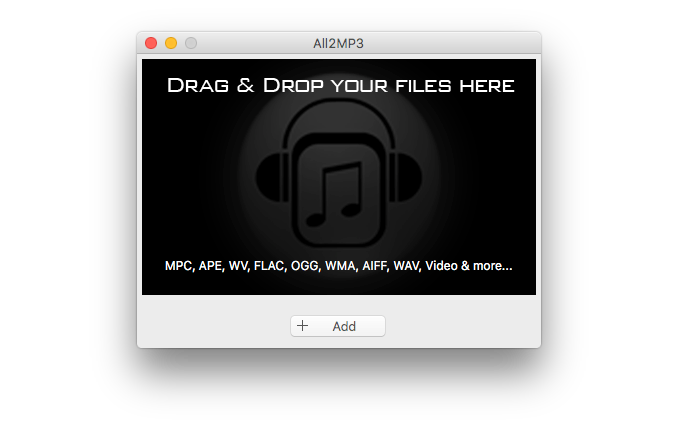
Step 1. Input Your Audio Files
Downloading and launching All2MP3 for Mac are necessary before you use it. After that, double-click the icon of All2MP3 for Mac to open it. You will see a very simple user interface which suggests you to drag and drop your files into the program window or click on “Add” button for uploading. To convert MP3 on Mac means that you can input either MP3 files to change its quality or files in other audio formats to convert them to MP3.
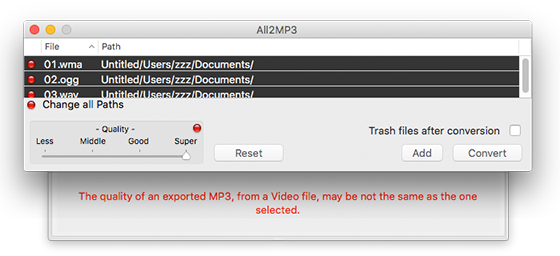
Step 2. Adjust Output Settings
The added files will be listed in the program window and you will notice that there is a “Quality” field. Drag the bar on the slider bar below to choose the quality level. At the right corner of the filed, there is a red button, click on it and it will turn into green, there you can choose the bitrate. If you want to restore the settings, click “Reset”. To choose the output folder, use “Change all Paths”. You are also allowed to add more files to convert or trash the source files after the conversion.
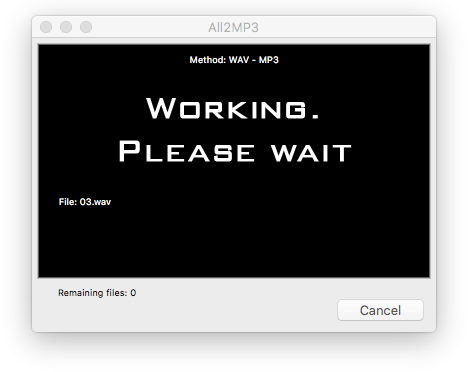
Step 3. Get Started
When everything is settled, just click “Convert” to get started. A few seconds later, you can find the converted files named of “xxx.mp3” in the output folder.