Apple Music is a subscription-based music streaming service. It comes with a list of features like offline listening and all music combination including songs ripped from a CD. Apple Music also supports radio stations playing, social ties and integration with Siri, which enables you to control things with voice commands. It not only lets you stream any track purchased from iTunes but also access music from a CD or downloaded from the websites. Apple Music is so robust that it now has over 30 million subscribers all over the world and in this article,we will show you how to use Apple Music in iTunes.

How to use Apple Music in iTunes
Mac OS now comes with a greater level of integration of Apple Music and iTunes that you can find any song you want easily within Apple’s streaming music subscription service. To use Apple Music in iTunes, just input the name of Apple Music’s library or any track in the top search box. If you click “search All Apple Music”, you will get a list of results including everything from songs, albums to a playlist and music videos.

It’s also easier to find new music. According to your regular listening habits, Apple uses algorithms to recommend songs that you may like but haven’t heard yet. You can find these suggestions in “For You” tab.
When you go to “For You” tab, you will find a list of “Recently Played” songs and the suggested tracks you may get interests in. If needed, you can fine-tune the recommending system that you can “heart” songs or artists. Now it’s only possible to “love” songs Apple recommends. To add your suggestion for each song, you can click the three dots in the “list” view or find the “hear” icon at the top of the player window.
Awesome Apple Music Tips For New Users

Fix Your Destroyed Playlists
There is a big issue in Apple Music is that when you enable its iCloud Music Library, it will destroy your existing playlists and metadata of songs in those playlists. Unwanted songs will be added to the playlist and the wanted songs will be deleted, and what’s worse is that it messed up the album artwork for each song.
Make Apple Music Available Offline
Apple Music is an awesome music streaming service which gives us access to over 36 million songs online. Of course, there must be times we don’t have a network connection. Fortunately, you can make any song or album from Apple Music available for offline enjoyment by saving them to your device.
Replace the Connect button with a Playlists button
In Apple Music’s “Connect” tab, you can see a stream of content from the artist you follow including photos, song lyrics, videos or text updates. This function is useful for hardcore fans, but some people might find it of little use and even a bit annoying. Thankfully, you can hide the “Connect” button with a more useful “Playlist” button.
Turn Off Apple Music Subscription Auto-Renew
You are allowed to try out Apple Music free for three months. This is a great feature for those who may find that they are not comfortable with a streaming subscription after they try it out at no cost.
How to Convert Music on Mac with All2MP3 for Mac
Music could come in a baffling variety of formats – so many that sometimes you come across a file format and even wonder what it is. Besides, there are issues like player or device compatibility and playback quality and many other reasons why you need to change the format of your media files. If you are searching for a music converter for Mac OS, this easy-to-use program – All2MP3 for Mac is your best choice. It can quickly convert common and uncommon audio file types to MP3 and any other popular format for easy playback and any devices.
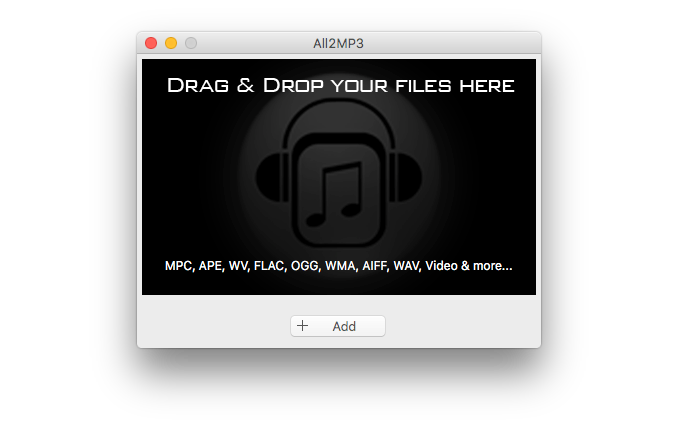
Step 1
In the program window of All2MP3 for Mac, it will show you how to input audio: drag and drop or use the “Add” button.
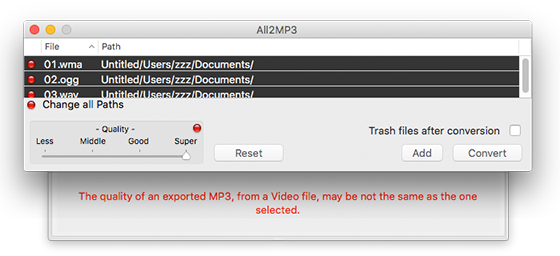
Step 2
In tis step you can control the output quality. Drag the slider bar in “Quality” area to the quality level you want. And you can choose the bitrate after you click the red button of “Quality” and it will change to green. With the button of “Change all Paths”, you can choose an output folder.
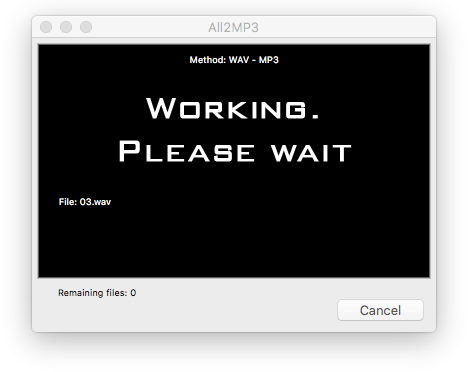
Step 3
Now, just click “Convert” button and your music will be converted into MP3 immediately.
In a word, for those who haven’t decided whether to stay on board with Apple’s streaming service or not, we hope the above tutorial and tips can really help them use Apple Music in iTunes with ease and make the most of all Apple Music offers.